
Replacing the Transmission - Gemini 105 M
I was having a problem where the engine would go from 2650 up to 2750 and back down. It started out that is would only do it a time or two but then in October of 2007 it became more frequent. After checking the engine, changing oil in the transmission several times, I began to believe the clutch was slipping. I took it to Sailcraft Service in Oriental and they also diagnosed it as the transmission. Unfortunately, you can't rebuiild our transmission. No parts are available in the U.S. So, after many phone calls by Phil of Sailcraft, he found the only one available in the US unless I wanted to wait at least 12 weeks. I didn't so he ordered it from Torrenson Marine and they took it off of a new engine transmission set. Thank you!!!
Below is the abrieveated description with a few pictures. I took this from our October 15, 2007 log.
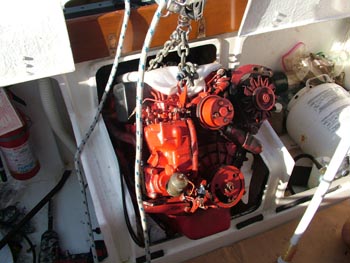
Oct 25 - We moved the boat over to Sailcraft Service on Tuesday at about 2 pm. I spent the afternoon taking everything off of the engine that I needed to to pull the engine. Of course Deb was already threatening to take the "plumber picture," you know, the one where his back side is up in the air with the crack showing. My crack wasn't showing but I will guarantee you that in all of the weird positions, that my back was feeling the pain of 4 and 1/2 boat units that were to come. On Wednesday at 9 am my mechanic, Ed, showed up and was ready to help. I found out he was a Porsche and Mercedes Mechanic before he started working on boats. Ed was great, he and I were able to work as a team and the engine came out. You can see to the right that we used a chain on the lift points and it had to be positioned so that first the engine came forward then the transmission had to be low for it to come out. And, out it came. You have about a 1/8 inch of clearance on each side for it to come out. But, out it came. We had a number of issues that I knew about before we started. Transmission, clean the heat exchanger and to free up the bolt that the alternator pivots on (I couldn't get the bolt out and I knew the alternator will fail when I can't get the bolt out.) |
 |
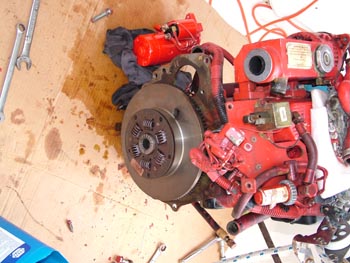 |
You can see on the left picture that I actually thought ahead and found a bunch of cardboard to put the engine down on. Actually, it wasn't me, my friend Gary told me to get old carpet to put in the cockpit, I couldn't find carpet so I got a bunch of cardboard. Great Idea!!! Thanks Gary! We got the transmission off along with the heat exchanger. When we took off the end plates of the heat exchanger it was obvious it needed cleaning so Ed took care of cleaning it out and when he was done, it was very clean and I can see a difference between the water flow before and after. I'm happy we did this. I had also ordered a new starter that I was planning on using for a spare, However, when we took the old one off to get access to the transmission, it was a pain. Therefore, I decided to install the new one and keep the old one as a spare. Hopefully, we will never have to do this underway. Access is not the easiest in the world. |
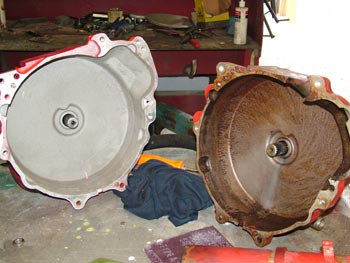
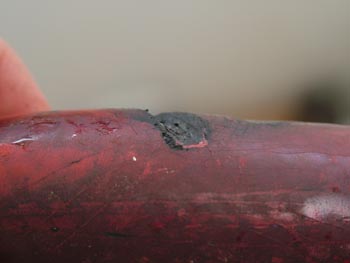
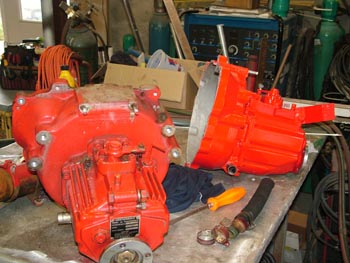
To the right you can see the new transmission bell housing to the left and the old one to the right. There is a bit of grease thrown over the old one but besides that, no difference. I will also tell you that we found some other issues while we we had the engine out. We found that the port side of the transmission hose had a wear spot on it. You can see the picture on the lower left. Ultimately we found that the reason for the wear was the port side motor mount is very close to the hose and that was causing the wear. I'll bet I only had 500 or so hours and this would have failed. We replaced the hose and also added some chafe protection to this hose. If you own a Gemini , you should check this and probably add chafe protection too. The new transmission painted up nice and red looked nice too. I also painted that heat exchanger and it dried over lunch. So far, we are 3 hours into the project. |
 |
 |
 |
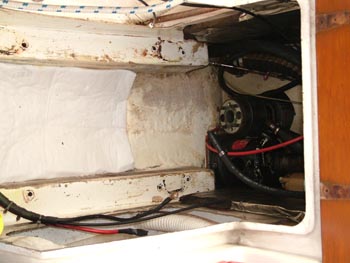 |
While the engine was out, I also cleaned up the engine well with bleach to get all the old stains out. You can see we removed all the motor mounts to pull the engine. That ended up being the easiest way to get everything out since we had to pull the engine forward an inch to clear the bolts for the flexible coupling. So far, we've now found the heat exchanger needed cleaning, a hose partially chafed through, a bad transmission and guess what? I also found the exhaust hose was going bad when I took off the 45 degree elbow which I was replacing. So, I already had a new exhaust elbow based on the recommendation from Westerbeke and replaced it when we put the engine back in along with that exhaust hose. |
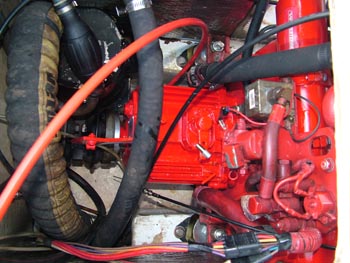
By 3 on Wednesday afternoon we had the engine and transmission back in and by 4 pm we had the engine aligned and all of the motor mounts tightened down. By the way, we replaced the rear mounts when we put the engine back in since I had them on board and one of them was bad. The picture to the right shows hoses going everywhere. That was my job on Thursday morning while it was raining. Put everything back on the engine I took off to get the engine out. By 11 am on Thursday I had the engine running again but since we had to drain all of the antifreeze, I had to also take almost an hour to get all the air locks out of the block by filling, running, stopping, filling....... it just goes on but after an hour, I had it all working great. By the way, the electrical connections you see to the lower right also had corrosion on them so I put dielectric grease on the connections and avoided another problem. In addition, I found two more places that I added chafe protection to. One was the throttle and stop cables which I added rubber surrounding them and wire tied it down to protect them. In addition, I also found the raw water intake line could rub on the starboard aft motor mound so I also added rubber around that hose too. I think we have had a great opportunity to find potential problems and prevent them from causing a problem for us in the future. By the way, we aligned the engine with the new motor mounts and now have it perfect in the horizontal direction and under 3 thousands in the vertical. It should be right. |
 |
After all was said and done, I feel very comfortable with the entire project. In addition to the parts I needed and the parts I put in to avert future problems, I also picked up a bunch of filters for our fuel system since I was at a Westerbeke place. I'm ready for the Bahamas' I hope. Well, I also picked up a vacuum gauge for our fuel system and that I'll show you later when I get it installed. The purpose of the vacuum gauge is to tell us early on if we have a filter problem. Well, the good news was that we spent 4 1/2 boat units and I don't feel like I've been taken advantage of. As a mater of fact, I feel like the people at Sailcraft have worked with me and allowed me to use my skills as much as possible to reduce my bill. The reality was the extra starter was over 600 bucks the filters were almost 200 and that means the replacement of the transmission was about 3.7 boat units with sales tax. Of course if I wouldn't have done all the other labor, it would have been at least 4.5 boat units. They treated me right, in my opinion, and I talked to Phil, the head mechanic, and he told me they don't mind working with boat owners who can help. This is a great philosophy and they are helping us cruise. We are now back at a marina and waiting for the rain to quit. I have some more boat cleaning to do and we also want to put an hour on the transmission testing it before we leave. I expect we will be out of here by Sunday for Beaufort, NC and then we will be off for Charleston, SC arrivng by Thursday. It looks like we are transforming from mechanic to cruiser again. |
|
Web Page by Jim Faughn